Tuesday, January 31, 2012

the waters have indeed parted!


Leave it to the Dutch!!
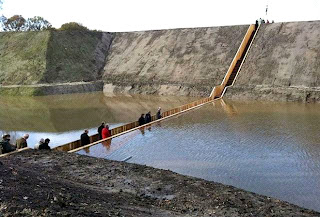
> No, your eyes are not deceiving you - the waters have indeed parted! This incredible "sunken" bridge
> located in the Netherlands is giving visitors a unique way to access a  beautiful 17th Century Dutch fort.
>
> Designed by RO & AD Architects, the Moses Bridge literally parts the  waters that surround the fort,
> allowing pedestrians to pass through. The bridge is made from sustainable Accsys Technologies
> Accoya wood, which is both FSC and PEFC certified.

> A series of moats and fortresses were built over the West Brabant Water Line region of the Netherlands
> during the 17th century in order to provide protection from invasion by France and Spain . Fort de Roovere
> was surrounded with a shallow moat that was too deep to march across, and too shallow for boats.
>
> In turn the earthen fort had remained protected -until now. From afar, the Moses Bridge is invisible to the eye. The flow of the
> moat appears continuous, as the water level remains at the same level, reflecting the surrounding foliage. As visitors approach the fort,
> the bridge appears as a break in the water with its sloping walls containing it. First lying flush with the earth, the bridge then descends deeper into
> the ground. Lined with wood sheet piling for walls, the deck and stairs sit  between. The bridge and its components
 have been made from sustainable hardwood that is Cradle to Cradle Gold  certified.
>
> The Accoya wood is also treated with a nontoxic coating, protecting it from fungal decay and increasing its durability - an ideal material for a sunken bridge.
> Like a dam, the walls of the bridge hold the waters of the moat back, and like Moses, the bridge parts the  waters so that pedestrians may pass.

Monday, January 30, 2012

How To create shortcuts on the desktop?


To create a shortcut on the desktop to a folder, program or file, there are two methods to choose from.
Method 1

  1. Locate the item that you want to create a shortcut for.
  2. Right-click on the item, click Send To , and then click Desktop (create shortcut)


3. The shortcut icon appears on your desktop


Note: The shortcut is identified by a small arrow at the bottom of the icon.

Method 2
To create a shortcut on the desktop to file shares:
  1. Right-click an open area on the desktop, point to New, then click Shortcut.
2. Click Browse and Locate the network drive to which you want  to create a shortcut, click on the network drive, and then click Next

 3. Type a name for the shortcut. If a Finish button appears at the bottom of the dialog box, click it.

4. The shortcut icon appears on your desktop.
 Advantage
The boot time of your computer will be reduced by using network shortcuts instead of active network drive connections which will not be automatically launched.
Helpful Tips:
  • To modify settings for a shortcut, right-click on the shortcut, and then click Properties. Settings that can be modified include the key combination used to start the shortcut.
  • To delete a shortcut, right-click the shortcut, and then click Delete. Or, you may drag the shortcut to the Recycle Bin. When you delete a shortcut to an object, the original object is not deleted.

Sunday, January 29, 2012

One in a Billion Shot

Imagine being in the right position in the right time to get one of these pictures !


  1. Mmmmmm this kitty kat is tasty

2. You got a little something in your nose let me get that for you!

3. Give me that Worm its MINE!!!!!!!!!!!!!!!!!!!!!!!!!


4. Nothing better then some nice fresh milk straight out of the milk maker :)


5. I don't agree with this sign, No Dogs allowed , CrAzY

6. Oh No, what happened? help SoS some one out there help me 


Live every day with enjoyment - we don't know what tomorrow will give us!

Saturday, January 28, 2012

Buying a Motorcycle in France

Well in this post we will post the names of Motorcycles i like as well as other information to help me make my decision easier to buy a motorcycle here in France

Motorcycles:

  1. VMAX 1200 (Mad Max Motorcycle)
  2. Yamaha Virago 700 and up
  3. Yamaha XJ900S Diversion -this is a good practical motorcycle that is reliable but not sexy
  4. Suzuki VX 800
Motorcycles not to get:
  1. Kawasaki 750 Zephyr

Websites:
So far this is the best site to actually find the motorcycles
this site doesnt have many motorcycles (used) for sale on it but it has some nice options to see what motorcycles are worth etc
http://www.moto85.com

Adobe Acrobat Pro - Batch processing

How to access the batch processing function in Adobe Acrobat Pro for manipulating PDF documents?
Sometimes, you may need to convert files into PDF files with a security password preventing from further PDF modification or whatever. This typical example may highlight one of the most powerfull (and hidden function) of Adobe Acrobat Pro.
To display the batch processing menu
  1. go to the Advanced menu from the menu bar and
  2. select the Document processing menu item and
  3. then Batch processing submenu.
From the Batch Sequences dialog you can select a pre-existing sequence or define your own sequence which will be saved and then display in the list of defined sequences which can be run.
If you click on the New Sequence button you will be first displayed a dialog requesting to give a name for this new sequence and then you will have access to the commands which can be implemented in the sequence.

Friday, January 27, 2012

Dangers of ICE


Here is a special health note that was just released by Health & Human Services.


When you drink vodka over ice, it can give you kidney failure.
When you drink rum over ice, it can give you liver failure.
When you drink whiskey over ice, it can give you heart problems.
When you drink gin over ice, it can give you brain problems.
Apparently, ice is really bad for you.
Warn all your friends.

Thursday, January 26, 2012

How to compare 2 docs in WORD


How to compare easily two versions of the same Word document?
If several persons work on the same document, it’s necessary to manage and organize its editing. While collecting all change proposals it’s good to use the word function Track changes. There are also some smart tools for collaboration which help you to avoid having two or more versions of the same document.
But what to do if it happens anyway?
To compare two versions of the same document by yourself (without any special tool) it’s not easy and almost impossible. WORD has a built-in function for this case!
This function could be very useful, if you missed to activate Track Changes.

A tip for power users: You can use this function also to compare other text files like results of SQL-queries, comma/tabulator separated values (CSV/TSV) and so on.

  1. Open WORD on your computer and go to the ribbon tab Review. In the section Compare select the menu item Compare.
  2. Choose your documents in the section 1 as original and in the section 2 as revision. If you already opened the related documents you can select them in the drop-down menus. Otherwise you have to use the directory icons (Open).
    The base for the comparison of these two documents is the original document. You can exchange these two documents with the green arrows (3) if you interchanged them while selecting.

 
You can change the search for differences by additional settings. Please click on More and finally confirm with OK.

3. Then you will get listed all differences.


On the left you can see the list of all differences.
In the middle you can see all changes in the context.
At the right side you will get shown the original text (in the upper section) and the revised version (in the section below).

Wednesday, January 25, 2012

Artifacting for Istockphoto II


How to Remove Artifacts and Avoid Istock Rejection (Part 2)

Just in case you didn’t read the title – this is part 2 of this photoshop tutorial. Here is a link to part one. Read part one first or else you’ll have no idea what we’re talking about here.
Ok, you read part one and you have a photoshop action named “create two edge masks” saved on your computer. Now it’s time to remove artifacts and digital noise from an actual photo that you plan to submit to istock. Normally, I run noise reduction (artifact removal) as the second to last step in my photoshop workflow (sharpening is last). When you use this process for an istock photo try to do it at the end of your editing process. For the purpose of this tutorial you can use any photo you want, and you don’t have to make this your second to last step in the editing process. Try to pick a photo that has some noise or artifacts so you can see what the process is doing.
The first step is to convert your photo to the LAB colorspace. Our “create two edge masks” action only works in LAB. Converting to LAB is easy. Go to the top menu bar and click image → mode → LAB color
aa1
Now it’s time to run our “create two edge masks action”. Press the action button to reveal the photoshop actions flyout menu. Locate the action named “ create two edge masks” and click on it to highlight it (see image below). Now press the play button. That’s it. All the steps we talked about in part one run behind the scenes and magically two new channels pop up in your channels pallet at the lower right corner of photoshop.
aa2
At this point your photo might look all black with a few white lines. Don’t worry. It looks like that because photshop is displaying one of the new channels rather than your photo. To fix this go to the channels pallet and make sure you’re displaying the correct channels. The lightness channel, the A channel, and the B channel should be activated. The little eyeball icon shows which channels are active. Clicking the eyeball turns that individual channel on or off. See the diagram below – you’re channels pallet should look like this diagram.
aa3
The next step is the easiest. We’re going to create a duplicate layer. To do this press ctrl+J. That’s it. In your layers pallet you’ll see a layer called background and one called layer 1. Layer 1 should be active, meaning it’s highlighted. Your layers pallet should look like the picture below.
aa4
Now we’re going to reduce the noise in Layer 1. From the top menu bar select filter → noise → reduce noise. This brings up the noise reduction dialog box. I’m not going to lie. I’m not an expert on the noise reduction dialog box. From experience I’ve developed a technique for coming up with noise reduction settings. Each image is different so you’ll have to come up with new settings for each photo. I simply scroll the noise reduction preview window around my photo to areas where I know there is artifacting. I then tweak the settings until the artifacting disappears from the preview window. Once I find settings that seem to remove all the noise I dial the settings back until the noise pops back up again. Then I dial the settings back up again until the noise just barely disappears. The object is to use the lowest possible settings that still remove all the noise. Does that make sense to you? If you have a better method please leave a comment. If my explanation doesn’t make any sense at all to you just use settings: Strength 7 all other sliders 25. That should do the trick without over doing it.
At this point it is time to load a channel as a selection, and then convert it to a mask. Sounds super easy, right? It actually is. Here it is step by step… Go to the top menu bar click select → load selection. This brings up a dialog box. In the lower window select “edge mask” (see image below). That is the channel we created with our photoshop action. Click OK.
aa5
Your photo now should be covered in ants marching selection lines. The next step transforms this selection to the mask, and it’s ridiculously simple. Click on the create layer mask button in the layers pallet (see image below, it’s the little rectangle with the circle in the middle). That’s it! The ants marching lines should have disappeared and a mask icon should show up next to layer one.
aa6
Your layers pallet should now look like this.
aa7
For those of you that have no understanding of what layers and masks do let me try to explain very briefly what’s going on at this point. Your photo, right now, is in theory two photos stacked on top of one another. The top photo in the stack is the one where we reduced the noise. The bottom photo is the original image. What’s displayed in photoshop is the top photo (the less detailed, slightly blurred, noise reduced image). The mask we created allows the bottom photo to show through in the areas of your image where there are lots of details or edges. What you’re getting is the best of both worlds. The details in your image stay sharp and the areas of no detail get noise reduction. Noise lives in areas with little detail so we’re essentially taking the fight to the home of the noise and creating no collateral damage. This technique works better than a smart bomb and doesn’t create a foreign policy nightmare. If you have no idea what I’m talking about don’t get anxious. I’m an airline pilot not a teacher. Follow the next few steps without thinking too much and we’ll all make it home safely.
If we weren’t submitting our photos to istock I’d say we’re done at this point. But, since the istock inspection process is so anal I have to add one more step to help you keep your photos from getting rejected. Noise and artifacts tend to exist in darker areas of your image only. Why run noise reduction on the entire photo when half the image is bright enough to have no noise at all? The way to get the reduced noise layer to not show in brighter areas is by using layer blending options. Once again, this is something that sounds way harder than it is.
Before we get into the blending options menu, do yourself a favor and press ctrl+alt+0 (the number zero, not the letter O). This zooms your image to 100% size. You need to do this now because you can’t do it with the blending options dialogue box open.
To open the blending options dialogue box right click on the small image icon in layer 1 in the layers pallet. From the menu that pops up click on blending options. See the image below.
aa91
We aren’t going to get too crazy with the blending options. We’re just going to move one of the sliders. Find the top right slider. Move it to the left. What this does is allow the bottom (more detailed, but more noisy) layer to show through where the top image is lighter than tonal value to the right of the slider. Is that hard to understand? Here’s a simpler explanation: the farther left you move the slider the more noise will show through. The trick is to move the slider as far left as possible without seeing any noise in the image. This lets the maximum amount of the detailed lower layer to show through and limits the blurred upper layer to areas of noise. The best method for setting the slider is to simply play around with it and also scroll around your blown up to 100% size image. Slide that top right slider back and forth and watch the noise appear and disappear. Eventually you’ll find the perfect spot where you don’t see any noise show through, but don’t set it any further right than that. Hopefully, the two example images below can show you better than I can write. Once you’re happy with the slider’s position click OK.  Note, you’re optimal slider position might be a lot further left than my example.  My sample picture was taken at High ISO and very noisy to start with.
aa10
aa111
We’re pretty much done. All that’s left to do is flatten the image. Right click on the background layer and click flatten image. Before you’ll be able to save this picture as a jpeg you’ll have to convert it back to RGB colorspace (image → mode → RGB color). Also, you’ll have to delete the two extra channels in your channel pallet. Simply drag and drop them into the trash. I always forget to do that step until I try to save the photo and photoshop only lets me save it as a psd document.
That’s the end of part 2. There is a part 3 coming up. I’ll show you how to remove artifacts from blue sky. Also, I’ll show you what to do with that mysterious Sharpen Edge Channel.
If you’re a photoshop master, I am sure you have already thought up some tweaks to improve this tutorial (how about doing the noise reduction on only the noisiest channel?)  Please leave a comment.  I’d love to hear from you.
Tuesday, January 24, 2012

Artifacting for Istockphoto I

Original Post

How to Remove Artifacts and Avoid Istock Rejection (Part 1)

Are you ready for this? I couldn’t use the actual words in the title because I was afraid I’d scare off those most in need of help. Today you’re going to learn how to create a useful (get ready for the scary words) photoshop action. This action will help you get your photos accepted into istock and then save you hours of labor because you’ll be able to run the action on each photo you submit to istock in the future. You only have to create the action once and then it’s yours forever, or at least until your hard drive crashes. If you have never created an action before don’t worry. It is easy. If you can’t figure it out by the end of this tutorial I’ll give you your money back.
Before we start let me first explain what this action will do for you… One of the primary reasons photos get rejected on istock is for artifacting. Artifacts are the little bits of digital noise that you can spot in magnified digital images in areas of shadow or large areas of even colors (a big blue sky for example). The normal way to get rid of artifacts is to run the reduce noise filter. The problem with running the reduce noise filter is it not only removes the noise, but also reduces details. Too much noise reduction is bound to get your photo rejected from istock for loss of detail. If only there was a way to preserve details and also remove noise… That’s where this photoshop action comes in. It creates a mask that preserves details when you run the reduce noise filter. And, since it’s so easy to add to this action I’m going to show you a great method for sharpening your edges in a way that won’t get your photos rejected from istock. Let’s Begin.
Start by opening a photo into photoshop. Pick a photo with some artifacting (you Nikon shooters will have lots of photos to choose from). If you don’t have an artifacty photo, don’t worry, open any photo. It doesn’t matter all that much.
Convert the photo to the LAB colorspace (image → mode → LAB color)
Here’s where the create action part begins – try not to be frightened. First to make sure we’re all on the same page go to the top menu and select window → workspace → default workspace Now that your screen looks correct, look along the right side pallet for the little triangle that looks like the play button on a CD player. Press it.  Below is a screen shot of the fly out menu you should see now see.
at1
Press the create new action button. This brings up a menu. In the name box type “Create Two Edge Masks” (you can name it whatever you want actually, but for ease of understanding you’ll probably want to stick with the names in this article). Now press the record button. From here on photoshop is recording every button you push so be careful to follow the next steps closely. If you screw up press the stop button (the little square) and drag your messed up action to the trash. You can then start over and try again.
Next, go to the lower right and find the channels pallet. Open it up, find the lightness channel, right click the lightness channel, and select duplicate channel.
at2
Another menu box will pop up. Name this new channel “Edge Mask”. Click OK. You should now see a new channel at the bottom of the channel pallet called “Edge Mask”. This is not the edge mask in its final form. We will modify it and turn it into an edge mask. This channel does not effect your photo in any way. It just sits there in storage waiting around for potential use later. We can do whatever we want to this channel and it will have no effect on your photo at all. Later, we’ll turn this channel into a mask – that’s where we’re headed, and that’s why we named it “Edge Mask”.
Click on the new channel called “edge mask”. This displays the new channel and none of the others. The little eyeball icon should be on the edge mask channel and none of the others. A black and white version of your original photo should be displayed.
Now, we’re going to start turning this channel into a mask. Go up to the top menu bar click filter → stylize → find edges. After running the find edges filter your photo will be nothing but black lines on a white background. These lines are the beginnings of a mask. Unfortunately the find edges command also finds the edges of artifacts. The next couple steps will fatten up the lines around actual edges and remove the lines from areas of noise and artifacts.  At this point your photo should look something like the picture below.
at3
Press ctrl+M to bring up the curves dialog box. We want to make the actual edges solid black and turn the artifacts white. To do this move the curves sliders to the positions shown in the diagram below. Most of the noise and artifacts live in the area on the right side of the histogram. By sliding the top slider to the left we turn all the noise white. Moving the bottom slider right darkens the black on the areas of detail in your photo. This step is an art and as you get more experienced with creating edge masks you may later want to change these curves to better eliminate noise and protect your edges.
at41
Next we’re going to fatten up the black lines. Go to filter → blur → guasian blur. Set the radius to 2.2 and press OK.
Now you have thicker lines, but they aren’t as dark black. To blacken them up again open up curves dialog by pressing ctcl+m and adjust the sliders like the example below.
at5
Ok, your edge mask is complete. We’re just going to add a couple more steps so you can also have a mask to use for edge sharpening. This is a two for the price of one action. Right click on the channel named “edge mask” and select duplicate channel. In the dialog box that pops up name this new channel “Sharpen Edge Mask” Click OK. You should now see a new channel named “Sharpen Edge Mask” directly below your edge mask. It will be highlighted and active as long as you haven’t clicked on anything else yet. Press ctrl+I to invert the channel. The image you see displayed should now be mostly black. If you have done everything correctly so far your channels pallet should look like the example below.
at6
We’re almost done. The last step is pressing the stop button up on your action recorder. It’s the little square button on the bottom left of the actions fly out menu. You can see it in the first diagram of this tutorial. Once you press the stop button photoshop is no longer recording your clicks and keystrokes, and your edge mask action is saved. If you want to create an edge mask for any photo in the future just select the action you named “Create Two Edge Masks” and press the play button. All the steps will run and two new edge masks will appear as if by magic in your channels pallet. There is one caveat though for this action. Before you run it you have to convert your image to the LAB colorspace (image → mode – LAB color) or else it won’t run. If you prefer working in RGB over LAB you can convert your picture back to RGB after the action runs and you will still have the new channels after the conversion. If you’re sharp and you like to use RGB, you could rerecord the action with the transformation to LAB and back to RGB as part of the action. I mostly use LAB so I leave my photos there until I save them.
Now that we’re done you’re probably asking yourself, “What do I do with these two extra channels?” I’m saving that for part two. Did I mention this is a two part tutorial? I might have left that out, sorry. I didn’t want to scare you off before we got started. The good news is Part 2 is where the fun stuff happens. We’ve gotten all the boring but necessary stuff out of the way. In Part Two we’re going to run noise reduction and do some Unsharp Mask (USM might get its own part 3). Most of you are probably familiar with that stuff so it won’t all seem so foreign. Don’t let your guard down though. I’m also going to teach you some scary stuff like loading a selection from a channel and transforming a selection to a mask. Try to get some sleep. You’ll need it.
Part two is now finished.  Part II

Sunday, January 22, 2012

Generation Y


Ever wonder why?

GENERATION SEGMENTATION?

People born before 1946 were called The Silent & Powerful Generation.
People born between 1946 and 1964 are called The Baby Boomers.
People born between 1965 and 1979 are called Generation X.
And people born between 1980 and 2010 are called Generation Y.

Why do we call the last group Generation Y?

Y should I clean my room?
Y should I wash and iron my own clothes?
Y should I get a job?
Y should I get a car when I can borrow yours?
Y should I buy any food?
Y should I leave home and find my own place? 

A cartoonist has explained it very eloquently…

Thursday, January 19, 2012

IPAD2 Apps


On this Post i will advice links etc for :
A google user with an IPAD 2 in France :) woohoo that was complicated

The IPAD is mainly a "Media Displayer"
Things that you will end up doing with you blog on a regular basis
  • reading the News/magazines
  • watching videos
  • reading a book
  • etc
thus if you are in the webmedia business you should absolutly get a IPAD but lets say you are an engineer!!
then everyonce in a while the IPAD and mostly the APPLE world will drive you a bit crazy cause its so closed off. I like open source thus i like google, it makes it easy for noobs to get on board.

Google Apps
here is the list of google apps that i was able to find right away download for free
  • Google Earth
  • Gmail
  • Google search
  • Google voice
  • Google Translate
  • Google Latitute
  • Google+
  • Google Books
  • Google Currents (Not sure what this is, but if its google i download it to learn)
  • Google Places
  • Google Catalogs(its interesting it for people who love to shop hahah)
and thats all that you can find easy enough. The must have is Google Search because with that appliction you can have access to all your usual google apps online even if there is no app for it.

Aeronautical technology apps
  • Eurocopter app (lets you stay up to date on the news of eurocopter and learn about EC)
  • Tech Beat (Quarterly magazine from Lockheed Martin)
Other Apps
  1.  hootsuite (social media app) only good if you use : Twitter, Facebook, LinkedIn and Foursquare
  2. AirDisplay (makes your IPAD a second screen for you computer, i love this idea, but this particular app is not free i will search for a free version and update this)
  3. Citrix go to my PC (we all need to start remoting into our laptops untill we go fully cloud)
  4. Dragon Dictation (tired of typing?)
  5. Mindmapping (havent found a free version for this but i'm sure it exists ) cannot find a free version
  6. Wordpress (for blogging, still not sure about this, but heck i'm a brand new blogger) Ok now i understand wordpress is another blogging site, thus nope note good to use if you are using blogger.com :)
  7. Netflix ( a must have!!! if you are in the USA but not in France)
  8. Pandora (Not in France)
  9. EpiCurious (cooking app) trying it out
  10. NASA App HD
    1. NASA APP
    2. NASA TV
    3. NASA Viz
    4. NASA Astroapp: Space Shuttle Crew
    5. NASA Desert RATS Virtual Test site
    6. NASA Astroapp: Space Station Crew
  11. NPR for IPAD
  12. TED for those who love TEDtalks which should be most people
    1. TEDiSUB: TED Talks with Subtitles
    2. TED Conferences
    3. TED Conference Guides  if you are ever at a TED Conference this is nice otherwise not really

Sunday, January 15, 2012

An indian and a Stone


The Indian With One “Stone”
There once was an Indian who had only one testicle
and whose given name was 'Onestone'.
He hated that name and asked everyone not to call him Onestone.
After years and years of torment,
Onestone finally cracked and said,'
If anyone calls me Onestone again I will kill them!'
The word got around and nobody called him that any more.
Then one day a young woman named Blue Birdforgot and said,
'Good morning, Onestone.'
He jumped up, grabbed her and took her deep intothe forest where he made love to her all day and all night.
He made love to her all the next day,
until Blue Bird died from exhaustion.
The word got around that Onestone meant what he promised he would do.
Years went by and no one dared call him by his given name until
a woman named Yellow Bird returned to the village after being away.
Yellow Bird, who was BlueBird's cousin,
was overjoyed when she saw Onestone.
She hugged him and said, 'Good to see you, Onestone.'
Onestone grabbed her, took her deep into the forest,
then he made love to her all day,
made love to her all night,
made love to her all the next day,
made love to her all the next night, but YellowBird wouldn't die!


Why ???


OH, come on... take a guess !!!


Think about it !!!


You're going to love this !!!


Everyone knows...

You can't kill Two Birds

withOneStone!!!

Friday, January 13, 2012

Music Time Machine


This is neat.   It's sort of a time machine of music.   Each of the years below connect to the best 20 hits of that year.   Pick a year, wait a few seconds, and the Juke Box will show you the 20 hits to select from.  You can play all 20 hits, or just those that you like.


 <http://upchucky.org/JukeCity/1980/OldJukes/player.htm> 1980
 <http://upchucky.org/JukeCity/1981/OldJukes/player.htm> 1981
 <http://upchucky.org/JukeCity/1982/OldJukes/player.htm> 1982
 <http://upchucky.org/JukeCity/1983/OldJukes/player.htm> 1983
 <http://upchucky.org/JukeCity/1984/OldJukes/player.htm> 1984
 <http://upchucky.org/JukeCity/1985/OldJukes/player.htm> 1985
 <http://upchucky.org/JukeCity/1986/OldJukes/player.htm> 1986
 <http://upchucky.org/JukeCity/1987/OldJukes/player.htm> 1987
<http://upchucky.org/JukeCity/1988/OldJukes/player.htm> 1988
<http://upchucky.org/JukeCity/1989/OldJukes/player.htm> 1989


 <http://upchucky.org/JukeCity/1990/OldJukes/player.htm> 1990
 <http://upchucky.org/JukeCity/1991/OldJukes/player.htm> 1991
 <http://upchucky.org/JukeCity/1992/OldJukes/player.htm> 1992
 <http://upchucky.org/JukeCity/1993/OldJukes/player.htm> 1993
 <http://upchucky.org/JukeCity/1994/OldJukes/player.htm> 1994
 <http://upchucky.org/JukeCity/1995/OldJukes/player.htm> 1995
 <http://upchucky.org/JukeCity/1996/OldJukes/player.htm> 1996
 <http://upchucky.org/JukeCity/1997/OldJukes/player.htm> 1997
 <http://upchucky.org/JukeCity/1998/OldJukes/player.htm> 1998
<http://upchucky.org/JukeCity/1999/OldJukes/player.htm> 1999

Thursday, January 12, 2012

How Was I Born?

How Was I Born?


A little boy goes to his father and asks 'Daddy, how was I born?' 

The father answers, 'Well, son, I guess one day you will need to find out anyway! Your Mom and I first got together in a chat room on Yahoo. Then I set up a date via e-mail with your Mom and we met at a cyber-cafe. We sneaked into a secluded room and googled each other. There your mother agreed to a download from my hard drive. As soon as I was ready to upload, we discovered that neither one of us had used a firewall, and since it was too late to hit the delete button, nine months later a little Pop-Up appeared that said": 


.
.
.
.
You got "Male" 

hahahahahahahhahahahhaha